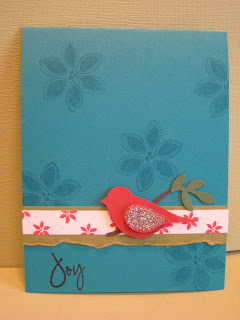
Hi everyone! Remember Me? Can you guess what my first New Year resolution is? Yep to start blogging again! hooray! I wanted to kick off the year by showing you a few cards I made for Christmas.
The first card (above) is one of my favorites. I love the "2 Step Bird Punch" (#117191). Here I punched the bird body in Riding Hood Red and then the tree branch and leaves in Chocolate Chip and Old Olive. I then used my 2Way Glue Pen and glitter to bling up the wing a bit. When I pieced the bird together I also used a Stampin' Dimensional dot to pop up the wing. The floral designs are from the stamp set Season of Joy (#110384). I have to admit the "Joy" stamp is not Stampin' Up!


I was really loving the "Season of Joy" stamp set and the swirl design on this card is also from that set. The Christmas tree and sentiment are from the set "Jolliest Time of the Year " (#116584). I used Stampin' Write markers to color in the tree and added glitter with my 2Way glue pen. I have a bling addiction so get used to this theme as you look on!
 Okay so this stamp set cracks me up and lends itself too one of my favorite coloring techniques. I use this design element a lot. Stamp the image in black ink and only color in certain aspects of the design. This technique also works great with Stampin' Round wheels and their images. On this card I used a MUST HAVE stampin' up product...GLITTER GLASS! It is basically old fashioned, chunky glitter. Watch my site here for the new color being introduced in a few weeks.
At the request of one of my stamping buddies I made these snowman tags for a swap this holiday season. The snowman body is made out of "White Circle Aluminum Edge Metal Tags" from the Clearance Rack on my Stampin' Up! site. They are on sale for only $1.49 a package and you get both sizes! For the top hat I used the "Round Tab Extra Large" punch (#119864). It works perfectly when you fold it in half. I have also seen really cute purses made with this punch. Then I used the "1 3/4 scallop circle" punch in Pumpkin Pie cardstock to make the noses. I simply cut triangles like cake slices out of the scalloped circle. I used silver cord to hook the head to the body and grosgrain ribbon to make the bow tie and tag holder. I had some little jingle bells which I thought were a perfect addition. The sentiment on the snow man is from a Paper Source stamp.
Gear up all you stampers because SALE-A-BRATION 2011 is coming soon! You can always find great techniques and project ideas on my Stampin' Up! site, not to mention shop directly from the site and have products on your doorstep in a matter of days!


