background

Showing posts with label cards. Show all posts

Sunday, August 7, 2011

Back from convention and so much to share...and show!

Okay disclosure time...I took over 350 pictures at Stampin' Up! Convention!  This post will be long but I have done my best to narrow down the pictures and only post the most informative ones.  First things first.  I went to Salt Lake City with my downline (the Nicole's).  We left on tuesday evening and got back sunday afternoon.  By the time we came home our heads were full of ideas and fun techniques we can't wait to try and share.  I don't know about the Nicole's but I had to take a break and didn't touch my stamps yet!  But I am planning on it this weekend before I forget everything.


If you have never been to a huge event like this, there is a tradition to make card fronts to swap.  I met so many women while I was swapping my 100 or so cards.  In future posts I will feature some of the swaps I got.  Some card makers did an awesome job and they did it over and over and over again.   Here is one of my swaps.  I used one of the triple punches to make the flower and then used Lucky Limeade, Rich Razzleberry, Whisper White and Basic Black Cardstock.  I also stamped the sentiment in Rich Razzleberry ink.  It is a fun phrase from the huge birthday set, Bring on the Cake.  Don't forget the bling in the middle of the flower!

The Kick Off Party was themed "Picnic in the Park" or something like that!  There was a make your own hat contest.  I made some hair flowers for Nicole and I, but as you can see Nicki went all out.  Her hat was ALL STAMPIN' UP!  This sign was in the lobby of our hotel.  We were still full of energy at this point.  The pictures got less fun and eventually turned into documenting ideas versus ourselves!


This is a woman we met from the midwest.  Her hat had every color of cardstock and all hand made embellishments.  We all agreed it was a first place finisher!  She hand carried it the entire way to Salt Lake City!

Here is Nicole with our very first Convention friend, Pam.  We met her in the airport and then saw her several times a day as she we were all in the same hotel.  She also gave us the cutest "I love stamps" pins.  We have to make her something really fun and mail to her...all the way in Missouri!


The main stage was quite a spectacle.  The colors changed with every presentation and event.  The flowers even grew in the back ground as convention went on.   One of my absolute favorite things was when they presented products from the upcoming holiday mini catalog.  In the picture above you can see that they hid the products under large boxes with fabulous paper flowers on top.  It was just like the Oprah show!  They would "unveil" the products one by one by removing the boxes.  All of us attendees would scream and squeal.  Even more so if they gave something away as a prize.  A women by us won a prize and she jumped up and down like it was a new car!  

After awards night there was an after party.  Don't you all love the "pocket sillhouettes" stamp images projected on the walls?  We had so much fun dancing the night away.  Too bad we had to get up sooo early for the First timers breakfast the next day!

Another place where I spent a lot of time was at the super creative vignettes that were set up in "Product Park".  Look on and drool.  There were also rows and rows of card and scrapbook samples.  This is where my camera really went to work.  I will post several of these card ideas at a later time.


The make-n-take session was like nothing I have ever seen before.  With 5,000+ attendees and only four make-n-take sessions you can imagine how many people were in each section!  We got lucky and sat by some lovely ladies that seemed to work at our same pace.  I had a great time but finished none of the projects! 

After the make-n-take session we went to lunch to meet our Idaho sisters!  Originally I joined Stampin' Up! through a friend of mine in Idaho.  However, I moved right after and never got to meet any of my upper upline.  We had fun making two cards and doing a swap of 20+.  The swap went fast, sorry for the blurry picture!  The little snowman card was one of our projects. 


Over all I had a great time and would go back to another convention tomorrow!  Okay maybe not tomorrow  but seriously considering next year!


Sunday, April 10, 2011

Spring is Blossoming at Stampin' Up!

Anyone who has known me for more than a year knows that my most FAVORITE time of year is when Stampin' Up! comes out with their new catalog. It happens every JULY! This year Stampin' Up! is letting us have a sneak peek of two new products before the new catalog is out. There is a new stamp set that is called Four Frames and of course, awesome new designer series paper. The best part of this sneak peek is that you can get them now! We don't have to wait until July!
Check out my site at wendyhalverson.stampinup.net to find the particulars including all of the items necessary to make these beautiful Stampin' Up! samples. Just click on the promotion section or shop section of my site.


Another exciting thing that I must tell you all is that I am going to CONVENTION this year!!! It is in July in Salt Lake city. Talk to me right away if you would like to sign up to get all of the perks of being a demonstrator and the chance to attend convention with me and thousands of other awesome stampers!


Sunday, March 20, 2011

Happy Spring!

Today I have been spending a lot of time planning a fun trip to Utah for Stampin' Up! Convention. For those of you who don't know, it is like the superbowl of stamping...or Christmas time! It is an exciting and huge event! I am going with my fellow Stampin' Up! Demonstrators Nicole and Nicole. Keep watch for pictures of cards I will be making to swap and postings about the fun times we will be having. Okay okay it is in July but I am pumped so had to tell you about it now! If anyone is interested in joining us you just have to sign up to be a demonstrator. Which is an AWESOME deal right now because it is sale-a-bration and that means tons of free stuff for signing up. If you are interested email me for more details!

Also for all you shoppers out there: Sale-a-bration ends in a few weeks! This is the huge Stampin' Up! sale where you get a free item of your choosing for every $50 purchase you make. It is my favorite time of year! visit wendyhalverson.stampinup.net to shop it up!

So this is the beginning of Spring? If you live around here you are experiencing, first hand, how spring "comes in like a lion"! Just wanted to a post a few of my latest creations. These are simple little cards that pack a whole lotta heart. Enjoy!

Saturday, January 1, 2011

Merry Christmas and Happy New Year!


Hi everyone! Remember Me? Can you guess what my first New Year resolution is? Yep to start blogging again! hooray! I wanted to kick off the year by showing you a few cards I made for Christmas.
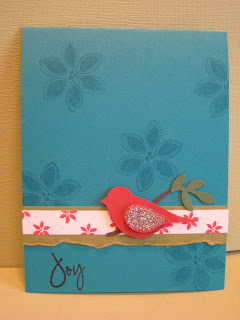
The first card (above) is one of my favorites. I love the "2 Step Bird Punch" (#117191). Here I punched the bird body in Riding Hood Red and then the tree branch and leaves in Chocolate Chip and Old Olive. I then used my 2Way Glue Pen and glitter to bling up the wing a bit. When I pieced the bird together I also used a Stampin' Dimensional dot to pop up the wing. The floral designs are from the stamp set Season of Joy (#110384). I have to admit the "Joy" stamp is not Stampin' Up!


I was really loving the "Season of Joy" stamp set and the swirl design on this card is also from that set. The Christmas tree and sentiment are from the set "Jolliest Time of the Year " (#116584). I used Stampin' Write markers to color in the tree and added glitter with my 2Way glue pen. I have a bling addiction so get used to this theme as you look on!

Okay so this stamp set cracks me up and lends itself too one of my favorite coloring techniques. I use this design element a lot. Stamp the image in black ink and only color in certain aspects of the design. This technique also works great with Stampin' Round wheels and their images. On this card I used a MUST HAVE stampin' up product...GLITTER GLASS! It is basically old fashioned, chunky glitter. Watch my site here for the new color being introduced in a few weeks.

At the request of one of my stamping buddies I made these snowman tags for a swap this holiday season. The snowman body is made out of "White Circle Aluminum Edge Metal Tags" from the Clearance Rack on my Stampin' Up! site. They are on sale for only $1.49 a package and you get both sizes! For the top hat I used the "Round Tab Extra Large" punch (#119864). It works perfectly when you fold it in half. I have also seen really cute purses made with this punch. Then I used the "1 3/4 scallop circle" punch in Pumpkin Pie cardstock to make the noses. I simply cut triangles like cake slices out of the scalloped circle. I used silver cord to hook the head to the body and grosgrain ribbon to make the bow tie and tag holder. I had some little jingle bells which I thought were a perfect addition. The sentiment on the snow man is from a Paper Source stamp.

Gear up all you stampers because SALE-A-BRATION 2011 is coming soon! You can always find great techniques and project ideas on my Stampin' Up! site, not to mention shop directly from the site and have products on your doorstep in a matter of days!

Tuesday, August 18, 2009

Summer is over but the fun is just beginning!

Hey everyone! So I have had a whirlwind summer to say the least. But the good news is that the whirling has not stopped! My next Stampin' Up! workshop is scheduled for Aug. 30th at 1pm! It is called Fall into the Holidays and we are making Halloween, Thanksgiving and Christmas projects! Don't miss it. You'll get great ideas for the upcoming holidays, plus there are some really fun prizes I am giving away too! If you are not on the evite already send me an email and I will add you on!


This is a card I made for my coworkers wife who broke her arm. Can you guess how? heehee. The stamps are hero arts and stampin' up! The paper is all stampin' up! I embroidered the swirlee line with brown embroidery floss. It added a fun little something. I also used copic markers to color the little girl. Easily one of my most favorite cards to date!

Monday, June 22, 2009

Oh yeah! I have had over 600 views!

Hi Everyone. I was pretty excited to see the "hit" counter for my blog past the 600 point! I know that at least 100 of them are just me! haha! But who cares! So tell your friends about the blog, send them a link....1,000 here we come!

Here are a few of my favorite cards for my most recent class "20 cards in 2 hours". Now, technically the class took about 3 1/2 hours if you take out chat time, break time, potty time and general off track conversations by the teacher! But we finished and everyone did a great job! Speaking of asides...I am working on learning how to change the "level" of my camera so the colors are more vibrant when I post these pictures. Stay tuned to be amazed! Maybe not today or tomorrow...but someday soon!

In this card we used the super popular Stampin' Up! "Top Note" die cut as well as the Stampin' Up! "Simple Flower" embosslit die. It is amazing how fast a card can come together with a few simple die cuts. The pearl is from the Stampin' Up! "pretties kit" and the stamp set we used was "All Holidays". The color inspiration for all 20 cards in the class came from the Stampin' Up! designer series paper "Sweet Slumber Specialty"...which is already sold out. But we had just enough for class and loved every thing we did with it! Because the colors in the photo are a little off they were : Baja Breeze, Ruby Red, So Saffron.

This is the simplest card in the bunch...but I think the cutest! We again used the designer series paper and the Stampin' Up! "Big Bold Cupcakes" sizzlit 4 pack dies. Did you all know that if you have a cuddlebug it works with the stampin' up! dies? I love this die set! A perfect cupcake everytime!

Saturday, May 30, 2009

Mix it up!!!

Hey all. You might be surprised to know that I sometimes use supplies that aren't exclusively Stampin' Up! heehee! This posting has a sampling of cards I made for a friend using the new Cosmo Cricket line "Early Bird" I DID however use Stampin' Up! rubons that are AWSOME! They totally matched the style of the paper too. Enjoy!

The stamped owl on this card is by Hero Arts and is my favorite! I used stampin' up! chalks to create the yellow hue onthe edge of the white piece. The owl is stamped in Kiwi Kiss. The "thank you" is a Cosmo Cricket sticker and the little green/blue flower that is part of coordinating chipboard stickers.

The "friends" is a Stampin' Up! rub on.

Don't you love the stampin' up! eyelet punch I used on the bottom of the green strip paper! It makes a little straight edge turn into a fancy accent!


The Cupcakes and words are rubons. The cupcakes on the card are stamped in kiwi kiss. It is so fun to use Stampin' up! coordinating things like these rubons and stamps!

Isn't this owl winking so cute!!! it is also a rubon from SU!

Thursday, May 21, 2009

A fun mother's day card.

I have no idea why it is underlining my words!!! Anyway, here is the card we made for mother's day. It was made using the fifth avenue floral set with the matching embossing folder. We then trimmed the flowers and did a "gate fold". I got the idea from a great stamper and you can see more of her work at http://stampingdoc.blogspot.com/
Have a great day!


Wednesday, May 20, 2009

Stampin' it up as always!


Hi everyone. I haven't posted in awhile but that is because I have been having sooooo many stamping events! The spring/summer season of Wendy's Workshops has been flying by and I have been having so much fun! So far Cinco de Mayo has been my favorite!

Here are some of the fun things I have been working on lately:


I am in love with these colors! The paper is kraft, baja breeze, apricot appeal and chocolate chip. The stamp set used was Say it was Scallops and the flowers are from the flower fusion bundle! I don't know why I haven't used them forever! They are so versatile and cute!

This is my crazy kissing card! I used pumpkin and red riding hood ink and paper colors. I kissed the lion with apricot appeal and red riding hood ink.

This is my card made with only rub ons! And some cute patterned paper too! I made it in 5min!

This was a card we made with the kissing technique in the technique tuesday club. It didn't come out too well in the photo but the alligator is kissed with baja breeze and kiwi kiss ink...it looks like scales. We used the wild about you set and the big deal alphabet.

Here is my favorite card ever! I used the trendy trees stamp set and I really like how it turned out. The card is sahara sand and look how well the versamark stamped trees show up at the bottom.
REMEMBER* you can order any of the products used to make these cards by going to wendyhalverson.stampinup.net